New Features
1. Questel Services Portal Integration
Overview
The Questel Services Portal Integration allows users to request estimations for patent filing and translation services directly within EC+, eliminating the need to navigate to or have separate access to QSP.
This feature is available to Standard Users, Administrators, and Questel Administrators on Patent object.
Requesting a Service
- Open a patent record and navigate to the Filing/Translation order button.
- Click Filing/Translation order
- The Service Type and Project Type Fields are default populated
- Choose the required Filing Type from the available options:
- 71(3) Claims Translation + EPV/UP
- Direct Filing
- EP Grant + EPV/UP Option
- EP Validation/UP
- PCT National
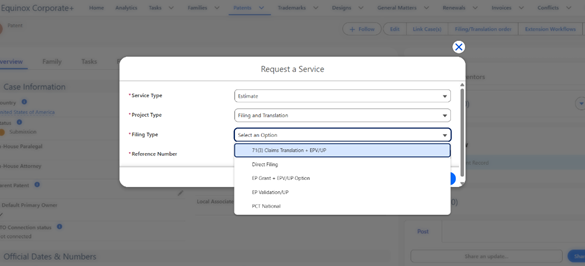
Based on the selected filing type, users will see different fields to complete the request.
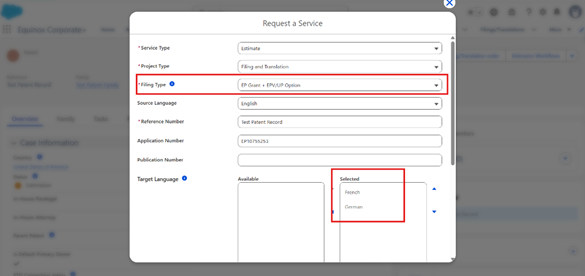
Creating a 71(3) Claims Translation + EPV/UP Service
Overview
Select this service if the user would like to translate the claims as part of the 71(3) Communication response and validate the patent in the designated states. The user may also request Unitary Patent filing or UPC opt-out as part of this workflow.
- Open a patent record and navigate to the Filing/Translation order button.
- Click Filing/Translation order
- The Service Type and Project Type Fields are default populated
- Select the "71(3) Claims Translation + EPV/UP" Filing Type
- The Application Number & Publication Number Fields are auto-populated from the patent record
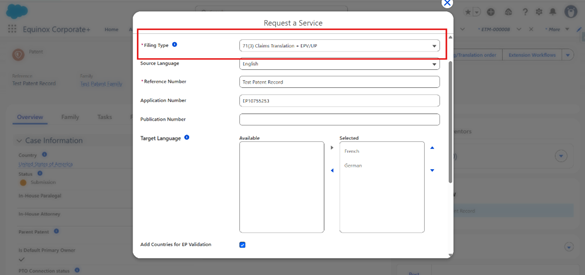
- The required Target Language are pre-selected automatically based on Source language.
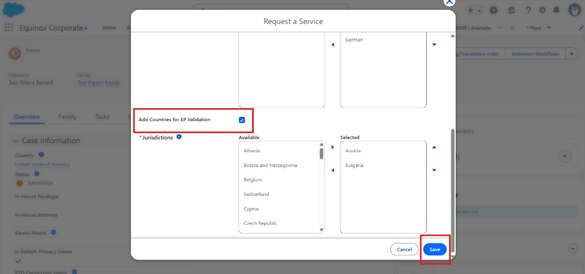
(For example, if the source language is English, the target languages are automatically selected as French and German.) - "Add countries for EP Validation" checkbox is auto-checked and Select the required Jurisdictions for EP Validation.
(Uncheck this option if EP Validation is not required) - Click Save.

After clicking Save, an Estimate is generated and a new Estimate record page is opened automatically.
Creating a Direct Filing Service
Overview
Select this service if the user would like to file a Paris Convention application, including payment of filing fees and preparation of the required translations. Priority data will be requested as part of this workflow. If no priority is claimed, the related fields will be removed automatically. PCT International may also be selected as a jurisdiction.
- Open a patent record and navigate to the Filing/Translation order button.
- Click Filing/Translation order
- The Service Type and Project Type Fields are default populated
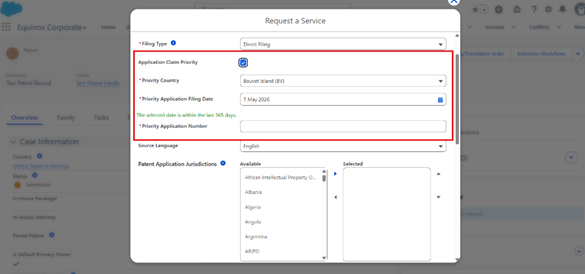
- Select the "Direct Filing" Filing Type
- The "Application Claim Priority" checkbox is auto-checked by default
(When checkbox is checked, user will see 3 additional fields)
i) Priority Country
ii) Priority Application Filing Date
iii) Priority Application Number
- Select the required "Patent Application Jurisdictions" or "Utility Model Jurisdictions" or both.
(Translation requirements are determined automatically based on the jurisdiction’s primary language.)
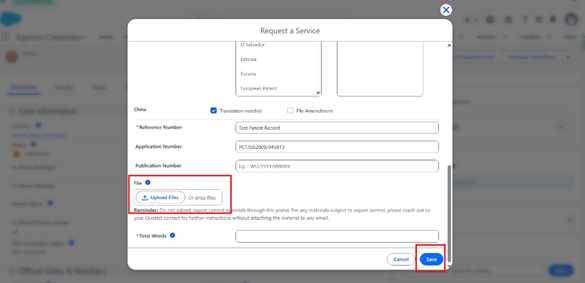
- Click the "Upload File" button to upload the file for which an estimate is required.
(Only Word/.docx documents are supported.) - Accurately complete the remaining fields : Total Claims, Total Words, Independent Claims, and Description Pages — to help prevent additional claim fees.
- Click "Save"

After clicking Save, an Estimate is generated and a new Estimate record page is opened automatically.
Creating a EP Grant + EPV/UP Option Service
Overview
Select this service if the user would like to handle EP Grant formalities and translate the claims as part of the 71(3) Communication response. The user can optionally select validation jurisdictions during this process, or request EP Validation at a later stage. Unitary Patent filing or UPC opt-out can also be included as part of this workflow.
- Open a patent record and navigate to the Filing/Translation order button.
- Click Filing/Translation order
- The Service Type and Project Type Fields are default populated
- Select the "EP Grant + EPV/UP Option" Filing Type
- The Application Number & Publication Number Fields are auto-populated from the patent record
- The required Target Language are pre-selected automatically based on Source language.
(For example, if the source language is English, the target languages are automatically selected as French and German.) - "Add countries for EP Validation" checkbox is auto-checked and Select the required Jurisdictions for EP Validation.
(Uncheck this option if EP Validation is not required) - Click "Save".
After clicking Save, an Estimate is generated and a new Estimate record page is opened automatically.
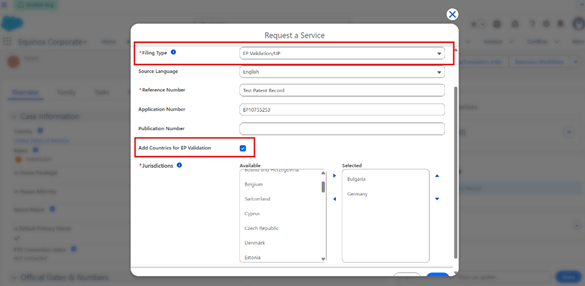
Creating a EP Validation/UP Service
Overview
Select this service if the user would like to validate a European patent in the designated states. This includes the required translations and completion of national validation requirements. Unitary Patent filing or UPC opt-out can also be requested as part of this workflow.
- Open a patent record and navigate to the Filing/Translation order button.
- Click Filing/Translation order
- The Service Type and Project Type Fields are default populated
- Select the "EP Validation/UP" Filing Type
- The Application Number & Publication Number Fields are auto-populated from the patent record
- "Add countries for EP Validation" checkbox is auto-checked and Select the required Jurisdictions for EP Validation.
(Uncheck this option if EP Validation is not required) - Click "Save"
After clicking Save, an Estimate is generated and a new Estimate record page is opened automatically.
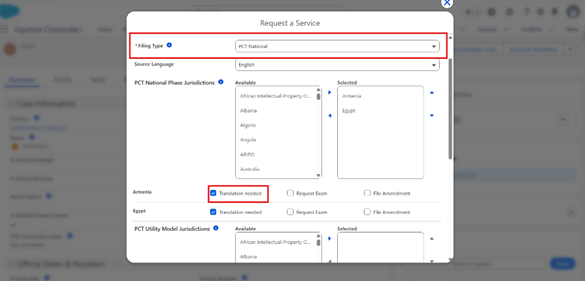
Creating a PCT National Service
Overview
Select this service if the user would like to handle National Phase Entry under the PCT, including payment of national fees and provision of the required translations.
- Open a patent record and navigate to the Filing/Translation order button.
- Click Filing/Translation order
- The Service Type and Project Type Fields are default populated
- Select the "PCT National" Filing Type
- Select the required "PCT National Phase Jurisdictions" or "PCT Utility Model Jurisdictions" or both.
(Translation requirements are determined automatically based on the jurisdiction’s primary language.)
- The Application Number & Publication Number Fields are auto-populated from the patent record
- Click the "Upload File" button to upload the file for which an estimate is required.
(Only Word/.docx documents are supported.)
- Click "Save"
After clicking Save, an Estimate is generated and a new Estimate record page is opened automatically.
Estimate Record Page
Overview
The Estimate Record Page now provides a consolidated view of all estimate details generated after submitting a Filing and Translation service request. This improves visibility into estimated costs and supporting files associated with the request.
The Estimate Record Page includes the following tabs:
- Cost Estimate
- Estimation Files

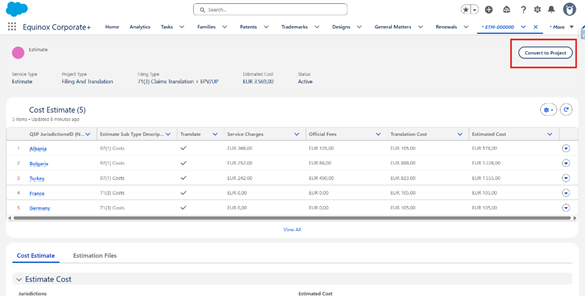
Cost Estimate Summary Table
A Cost Estimate Summary table at the Estimate Record Page provides users with a quick overview of the generated estimate details.
Key Features
- Displays selected jurisdictions included in the estimate
- Shows total estimated cost and currency information
- Provides a consolidated summary view for quick reference

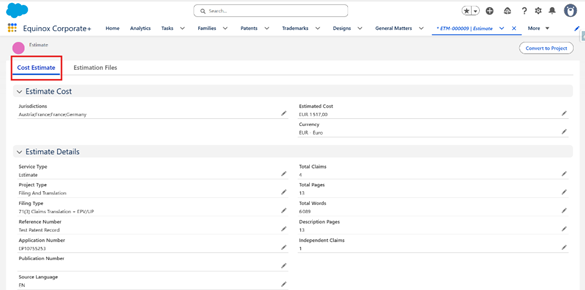
Cost Estimate Tab
Click on Cost Estimate tab to view complete estimate summary and filing-related details generated for Filing and Translation service requests.
Key Features
- Displays estimate summary details such as selected jurisdictions, total estimated cost, and currency
- Provides estimate-related information including filing type, application details, claims count, page count, and word count
- Shows filing and patent-related information in a centralized and organized layout
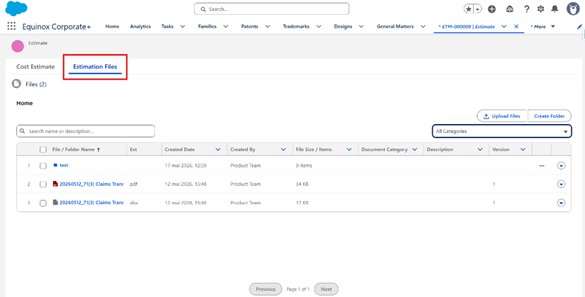
Estimation Files Tab
The Estimation Files tab allows users to view and manage all files associated with the Filing and Translation service request from a centralized location. This includes uploaded service-related documents along with the generated Estimate PDF and Excel files.
The tab leverages the Files Component introduced as part of the Oppenheimer Release under the Document Management System enhancements.
Key Features
- Displays all uploaded files related to the service request
- Provides access to generated estimate documents in:
- PDF format
- Excel format
- Supports file search, categorization, and document management capabilities through the Files Component
- Centralized document access directly from the Estimate Record Page
Actions on a Single Document
Click the action icon on any document to see the available options:
- Download — Download the file to your computer.
- Share — Open the sharing window to grant access to specific users within your organisation.
- Public Link — Generate a shareable URL to distribute the document outside the platform.
- View File Details — Open the document's dedicated record page (see below).
- Upload New Version — Open your file explorer to upload a new version of the document.
- Edit File Details — Edit the document's metadata fields.
- Delete — Permanently delete the document. A confirmation modal is required before the deletion is applied.
Selecting Multiple Documents
You can select several documents at once using the checkboxes. A counter showing "X items selected" updates dynamically as you make your selection. The following bulk actions become available:
- Download — Download all selected documents individually.
- Download as .zip — Package all selected documents into a single ZIP archive and download it in one click.
- Copy to Another Case — Available when at least 2 documents are selected. Clicking this button opens the Copy to Another Case modal (see below).
Linking Documents to Another Estimate
- Select the documents you want to copy (at least 2).
- Click Link to Another Case.
- In the modal, the object type (e.g. Estimate) of the destination record is default populated.
- Use the lookup field that appears to search for and select the target estimate record.
- Once both fields are filled in, click Link.
A success notification confirms the documents were linked. If an error occurs, a message prompts you to try again.
Note: You can only link to objects that are accessible based on your permission set.
The File Record Page
Every document has its own dedicated record page, accessible via View File Details in the action menu. This page includes:
- Highlight Panel — A compact summary of key metadata, with the same action buttons as in the Files tab.
- Details — All core and custom metadata fields for the document.
- Related Cases — All case records currently linked to this document, with the ability to add or remove links.
- Versions — The full version history of the document. You can view and download any previous version.
- Preview — A preview of the document content directly in the page.
- History — A log of all field changes made to the document record over time.
- Tags — A widget for adding and managing topic tags on the document.
Converting to Project
Overview
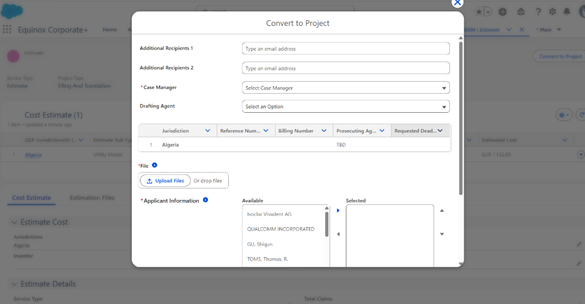
The Convert to Project functionality allows users to confirm an approved estimate and initiate the Filing and Translation project directly from the Estimate Record Page.
When users click on the Convert to Project button, a dedicated screen is displayed to capture all required project confirmation details before project creation.
Key Features
- Allows users to confirm and proceed with the selected estimate
- Captures project-related details such as:
- Intention to Grant Date
- Additional Recipients
- Case Manager
- Jurisdiction-specific Reference and Billing Numbers
- For Direct Filing and PCT National filing types, additional fields are displayed:
- Prosecuting Agent
- Requested Deadline
- Supports file upload during project confirmation
- Enables selection and review of applicant information before project creation
- User can also provide special instructions regarding translation and filing.
- After filing all the details, click on "Save" to create the project.
After clicking Save, the Project is created and a new Project record page is opened automatically.
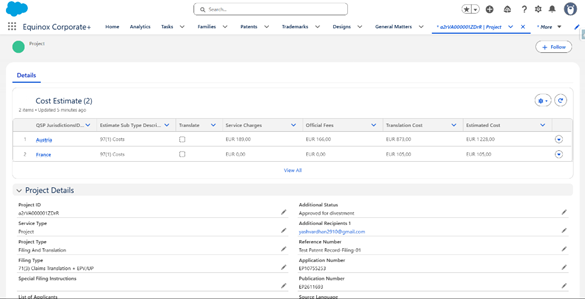
Project Record Page
Overview
The Project Record Page provides a centralized view of all project-related information generated after converting an approved estimate into a Filing and Translation project.
The page enables users to track project details, estimate information, filing data, and important deadlines from a single location.
Key Features
- Displays linked Cost Estimate records with jurisdiction-wise cost details
- Provides project information such as Project ID, Filing Type, Application Number, Publication Number, Status, Case Manager, and Currency
- Displays applicant, inventor, filing instruction, and project log details
- Includes a dedicated Dates and Deadlines section for tracking important filing deadlines and project date.
Enhancements
1. Goods and Services Enhancement
Overview
The Goods and Services (G&S) enhancement allows users to manage, structure, and preview trademark Goods and Services grouped by Nice Class directly within EC+, providing full visibility and version tracking of the trademark protection scope.
This feature is available to Standard Users, Administrators, and Questel Administrators on Trademark, Conflicts, Third Party Right, General Matter.
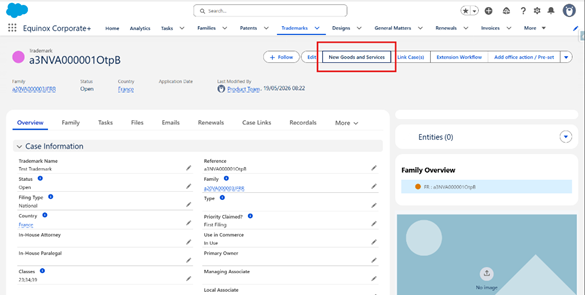
Creating a New Goods and Services
- Open a trademark record and navigate to the New Goods and Services button.
- Click New Goods and Services
- The "Add Goods and Services" popup screen opens with all the 45 Nice classes
- Select the required Nice classes
- Once a Nice Class is selected, users can view and edit the corresponding class description and related details like status, language.
(Users can select the class description language from English, French, German, and Japanese.) - Click Save to add the selected classes to the trademark record.
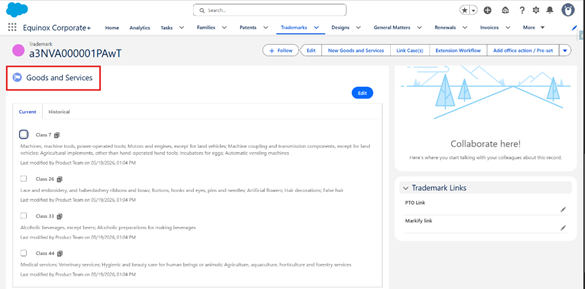
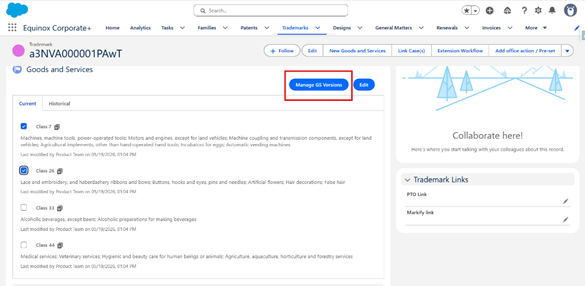
Goods and Services Component
Once the Goods and Services are added to the Trademark record, users can scroll down within the same record to view the Goods & Services component.
Managing Goods and Services Versions
- Select the Nice classes you want to edit using the checkboxes from the Goods and Services Component.
- Navigate and Click on the "Manage GS Version" button.
- The "Manage Goods and Services versions" popup screen opens with all the selected Nice classes
- It displays Current and Historical versions of Nice Class descriptions for comparison
- Allows users to edit the current Nice Class description
- Supports adding a Reason for Change comment while updating descriptions
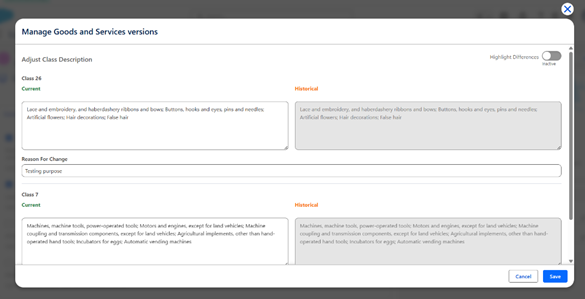
- Users can toggle on the "Highlight Differences" toggle on the top-right to visually compare changes between versions
- Newly added text is highlighted in green under the Current section
- Removed text is highlighted in orange under the Historical section
- Click Save to modify the selected classes to the trademark record.

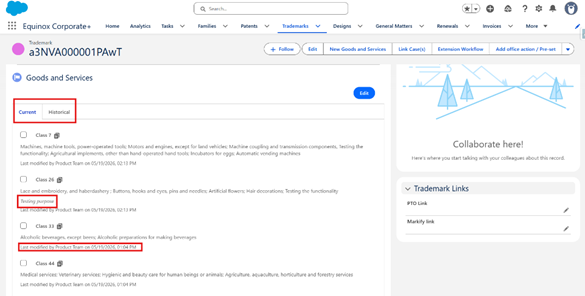
Version Tracking
The Goods and Services component now supports version tracking through dedicated Current and Historical tabs, allowing users to easily review and track changes made to Nice Class descriptions
- Users can switch between Current and Historical tabs to review Goods and Services versions
- Displays the latest and previous Nice Class descriptions for easy comparison
- Shows details of the last modification, including:
- Last modified user
- Last modified date and time
- Displays the "Reason for Change" comments associated with description updates
2. Pavis Integration
Include the last fixes found during the UAT and new way to cancel standing order:
Salesforce will send to Pavis a cancellation request, then a delete request these instructions are managed via buttons or in case of deletion of the asset record (Patent, Trademark or Design with a standing order registered in Pavis).
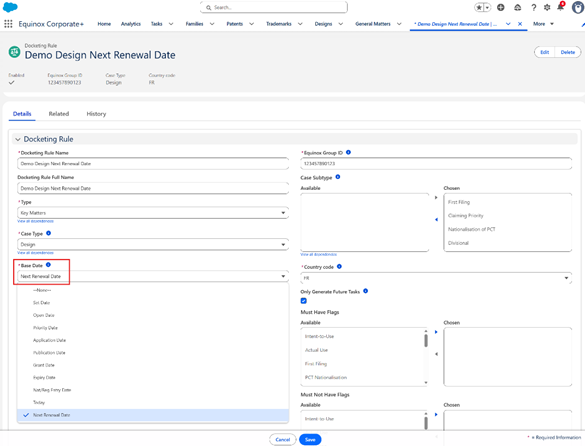
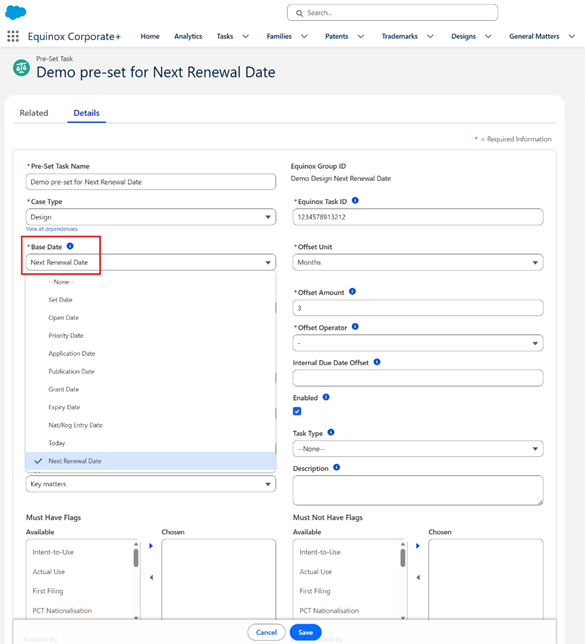
3. Docketing rule: Add Next Renewal Date as Base Date
Overview
Adding the ability to trigger docketing tasks upon population or update of the Next Renewal Date on a case.
Enhancement
The Next Renewal Date is now available in the Base Date picklist for both docketing rules and presets.
When a docketing rule uses "Next Renewal Date" as its Base Date, any population or update of this date on a case will automatically trigger the creation or update of the associated tasks.
For pre-sets task, selecting “Next Renewal Date” as the Base Date allows users to automatically generate tasks with a defined offset whenever the Next Renewal Date is populated or updated.
|
|
4. Trademark Renewal task: manage designated countries task
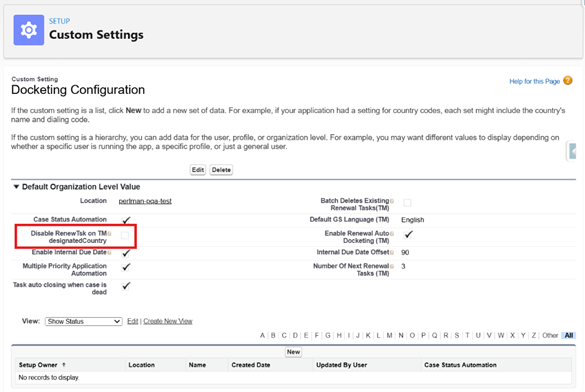
Enhancement
The Docketing Configuration within the Custom Setting has now a new setting to activate or not the renewal task on designated countries.
This setting is a checkbox named "Disable RenewTsk on TM designatedCountry" and the default value is Checked.